- Getting Started
- Code Review
- Platforms
- Agentic Coding
- Configuration
- CI integrations
- Design Tools
- Developer Tools
- Web Projects
- Get Notified
- API
- Single Sign On
- Self-host
Single Sign On
- Getting Started
- Code Review
- Platforms
- Agentic Coding
- Configuration
- CI integrations
- Design Tools
- Developer Tools
- Web Projects
- Get Notified
- API
- Single Sign On
- Self-host
Single Sign On
SAML
This feature is only available for Enterprise.
You can configure Screenshotbot to sign in users with SAML from your Identity Provider (IdP), such as Okta, Microsoft Entra ID or Google Workspace. You'll need to be an admin on Screenshotbot to configure SAML.
Once SAML is active, the sign-in page goes straight to your IdP, and anyone your IdP lets through can sign in. Users are created the first time they sign in.
Step 1: Create the connection in Screenshotbot
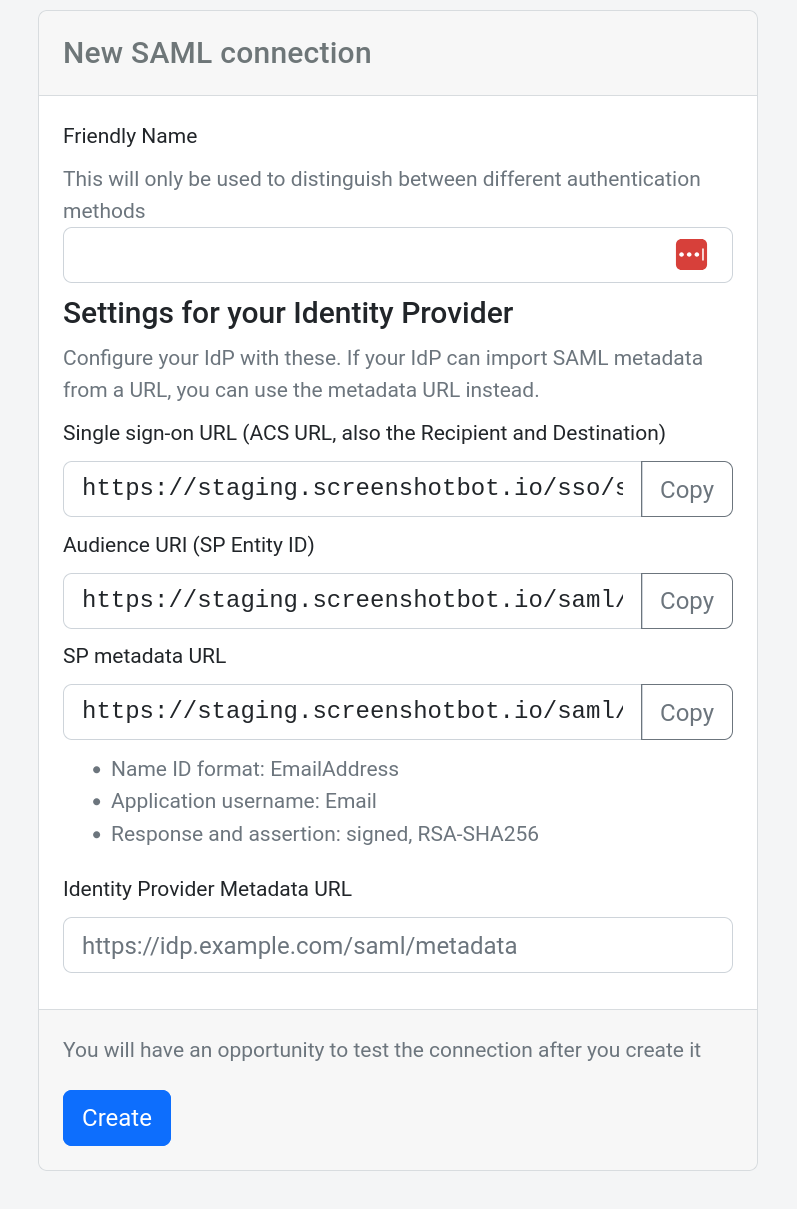
Go to /sso on your Screenshotbot installation (for example https://example.screenshotbot.io/sso) and click Create.
The form shows the settings you'll need for your IdP. Keep this page open, since you'll fill it in once your IdP is set up.
Step 2: Set up Screenshotbot in your IdP
Create a new SAML application in your IdP, and copy these values from the form:
- Single sign-on URL (also called the ACS URL, Recipient or Destination): https://your-domain/sso/saml/callback
- Audience URI (also called the SP Entity ID): https://your-domain/saml/metadata
- Name ID format: EmailAddress
- Application username: Email
- The response and assertion should be signed, with RSA-SHA256
If your IdP can import Service Provider metadata from a URL, you can give it the SP metadata URL instead.
In Okta, these are on the Configure SAML step of the app integration wizard. Assign the users or groups who should have access to Screenshotbot.
Step 3: Add your IdP's metadata URL
Your IdP will give you a metadata URL for the new application. In Okta, this is the Metadata URL on the app's Sign On tab.
Back in Screenshotbot, give the connection a name, paste the metadata URL into Identity Provider Metadata URL, and click Create.
Screenshotbot has to be able to fetch the metadata URL. If your IdP is only reachable on an internal network, contact us and we'll help you set it up.
Step 4: Test the connection
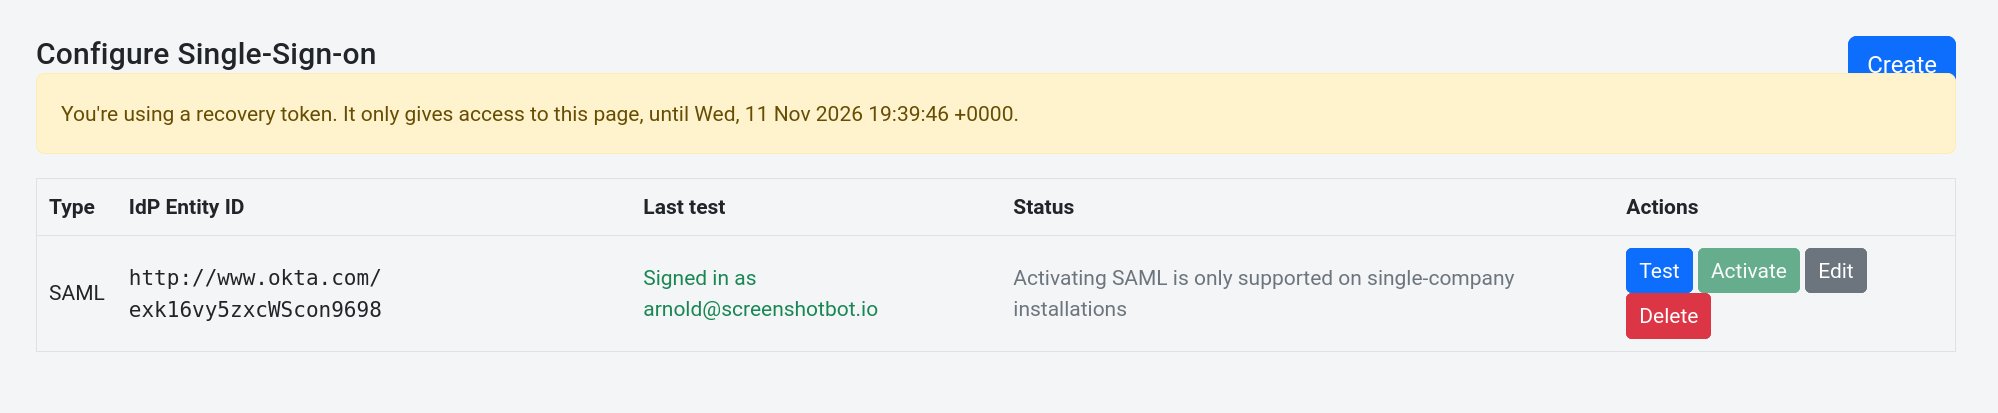
On the /sso page, click Test next to your connection. You'll be sent to your IdP to sign in, and then back to the SSO page with the result.
A test doesn't change how you're signed in to Screenshotbot, and doesn't affect anyone else, so you can test as many times as you need.
Step 5: Activate
Once the test succeeds, click Activate. From then on, everyone signs in through your IdP.
To make sure you don't lock yourself out, you can only activate a connection that you've tested yourself in the last hour. If you edit the connection after testing it, you'll need to test it again.
Changing or removing the connection
- Edit lets you rename a connection. You can only change the metadata URL of a connection that isn't active.
- Deactivate turns SAML off, and sign-in goes back to how it worked before. Users who don't have another way to sign in will be locked out.
- Delete removes a connection. You'll need to deactivate it first.
To switch to a new IdP, create a second connection, test it, and activate it. This replaces the active connection in one step, so nobody is locked out in between.
If you're locked out
If SAML is active but no longer works, for example because your IdP application was deleted, contact us. We'll send you a short-lived recovery token. Go to /recovery on your Screenshotbot installation and enter the token. This gives you access to the SSO and Team pages only, so you can fix or deactivate the connection, or change who is an admin.